Recover Deleted or Overwritten Content from a Backup Content Database
This article explains how to temporarily restore and register an older WEBCON Content database in order to recover deleted or overwritten application objects when no *.bpe export is available. It covers the required SQL configuration changes, how to switch between Content databases in Designer Studio, and how to remove the temporary database entry after the recovery process is completed.
Scenario
Imagine that you have accidentally deleted or overwritten objects in your application and do not have an exported *.bpe file that could be used to restore them. Furthermore, no other environment contains these objects from which their configuration could be recovered. In this situation, the only option is to restore a previous database backup, provided that a backup containing the required version is available.
Assumption
This article assumes that the lost content exists in an earlier version of the Content database BPS_TEST_Content, which needs to be restored.
The easiest approach is to add the restored database under the name BPS_TEST_Content_BAC.
Restore Content database
Open SQL Server Management Studio (SSMS) and review the entries in the table ContentDatabases of your *_Config database:
SELECT * FROM [BPS_TEST_Config].dbo.ContentDatabasesIf you only created one Content database during installation the query result looks like this:

Important: Before performing any of the following steps, create a current backup of all affected databases. This ensures that you can easily revert any unintended changes and restore the system to its original state if necessary. Never perform database modifications in a production environment without a verified backup and a tested recovery procedure.
The next step is to register the restored database in this ContentDatabases table. Before executing the following INSERT statement, ensure that no entry with the same CD_Name already exists in the ContentDatabases table. Then execute(*) the following query.
INSERT INTO [BPS_TEST_Config].dbo.ContentDatabases (CD_Name, CD_Type)VALUES ('BPS_TEST_Content_BAC', 1);(*) Please note that performing database modifications (e.g. INSERT, UPDATE or DELETE statements) directly in the WEBCON databases is officially unsupported by WEBCON.
Content database selection
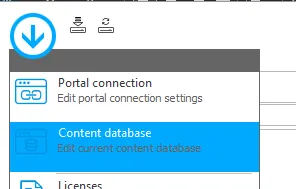
Once you have added the restored Content database, open Designer Studio. Using the main menu click on “Content database” …
… a list of all available Content databases is displayed in the picker dialog. You can switch between the databases whenever required.
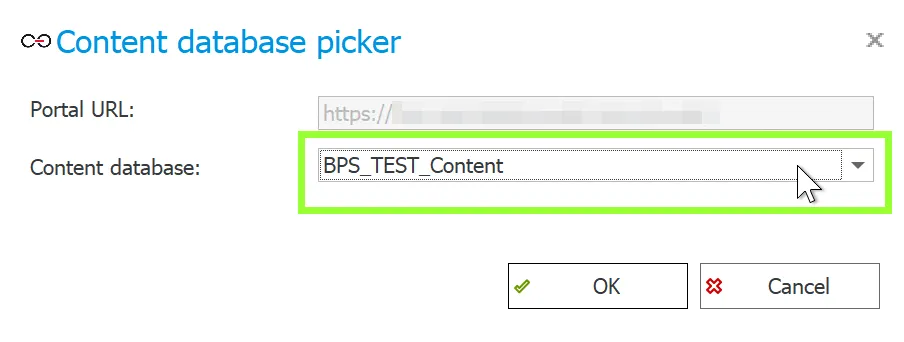
You can now export the required application or process from the restored Content database, switch back to the original one and import the *.bpe file to restore the desired objects. Alternatively, you can manually copy and paste the required configuration.
Cleaning up the ContentDatabases table
After restoring the required information, you can clean up the ContentDatabases table.
Remove the entry with the CD_Name value BPS_TEST_Content_BAC that you added before by executing the following query.
Be careful if there is more than one entry in the table with the same name. If in doubt, rerun the previously shown SELECT query in this article and note the corresponding value from the CD_ID column if multiple rows share the same CD_Name.
DELETE by CD_NAME
DELETE FROM [BPS_TEST_Config].dbo.ContentDatabasesWHERE CD_Name = 'BPS_TEST_Content_BAC'DELETE by CD_ID
DELETE FROM [BPS_TEST_Config].dbo.ContentDatabasesWHERE CD_ID = ##PUT THE ID HERE##Special thanks to to Daniel Krüger for the original database restore approach and SQL script in this post: Copy a database - Daniel’s notes
Comments
Comments will be added here later.